> ## Documentation Index
> Fetch the complete documentation index at: https://docs.chatbotplatform.io/llms.txt
> Use this file to discover all available pages before exploring further.
# Custom Headers
> Add authentication and custom headers to integration requests
Custom headers allow you to add authentication, routing information, and metadata to requests sent to your AI backend integrations.
## Why Use Custom Headers?
Headers enable:
* **Authentication**: API keys, bearer tokens, OAuth
* **Routing**: Direct requests to specific endpoints or versions
* **Tracking**: Add identifiers for analytics and logging
* **Feature Flags**: Enable/disable features per request
* **Custom Metadata**: Pass any additional information to your backend
## Adding Headers
Navigate to your integration and click **Edit** or create a new integration.
Find the **Headers** configuration section.
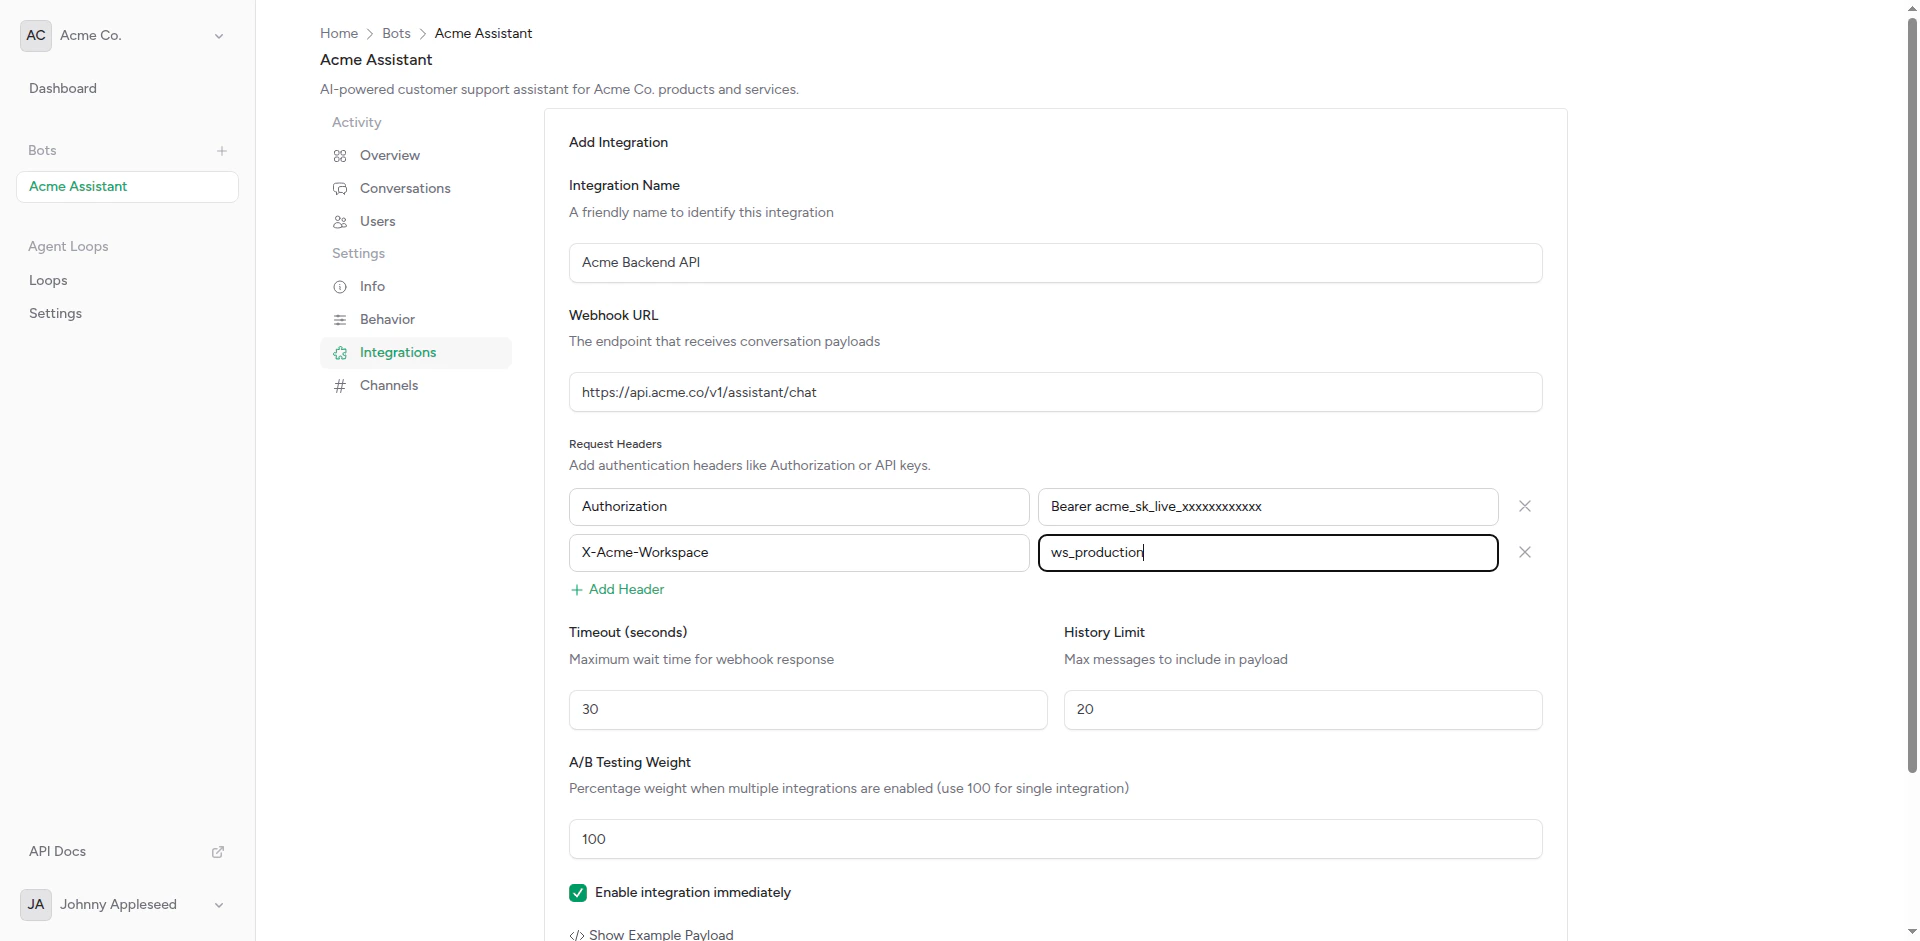 Enter header name and value pairs:
```
Name: Authorization
Value: Bearer sk-proj-abc123...
```
Click **Add Header** to include additional headers.
Click **Save** to apply the configuration.
## Common Header Patterns
### Authentication Headers
**Bearer Token**:
```
Authorization: Bearer sk-proj-abc123xyz...
```
**API Key**:
```
X-API-Key: your-api-key-here
```
**Basic Auth**:
```
Authorization: Basic base64(username:password)
```
### API-Specific Headers
**OpenAI**:
```
Authorization: Bearer sk-proj-...
Content-Type: application/json
```
**Anthropic**:
```
x-api-key: sk-ant-...
anthropic-version: 2023-06-01
Content-Type: application/json
```
**Custom Service**:
```
Authorization: Bearer YOUR_TOKEN
X-Service-Version: v2
X-Client-ID: chatbot-platform
```
### Tracking and Analytics
**Request Identification**:
```
X-Request-ID: unique-request-id
X-Bot-ID: bot_123
X-Team-ID: team_456
```
**User Context**:
```
X-User-Platform: telegram
X-User-Tier: premium
X-Conversation-ID: conv_789
```
### Feature Flags
**Enable Features**:
```
X-Enable-Streaming: true
X-Enable-Tools: true
X-Max-Tokens: 1000
```
## Dynamic Headers
Some headers are automatically added by the platform:
### Platform-Added Headers
```
X-Chatbot-Platform-Version: 1.72.4
X-Bot-ID: bot_abc123
X-Integration-ID: int_xyz789
User-Agent: ChatbotPlatform/1.0
```
These are included in every request and cannot be overridden.
### Request-Specific Headers
The platform may add context-specific headers:
```
X-Conversation-ID: conv_abc123
X-User-Platform: telegram
X-Message-Count: 5
```
## Security Best Practices
**Never expose API keys in client-side code**. Headers are configured server-side and never exposed to end users.
### Protecting API Keys
**Do**:
* Use environment variables for sensitive values
* Rotate keys regularly
* Use separate keys for development and production
* Restrict key permissions to minimum required
**Don't**:
* Hardcode keys in application code
* Share keys in documentation or screenshots
* Use the same key across multiple services
* Grant excessive permissions to API keys
### Header Validation
Your backend should validate:
* **Authentication**: Verify token is valid and not expired
* **Authorization**: Check token has required permissions
* **Origin**: Optionally verify requests come from Chatbot Platform
* **Rate Limiting**: Implement per-key rate limits
## Advanced Use Cases
### Multi-Environment Setup
Use different headers for different environments:
**Development Integration**:
```
Authorization: Bearer dev-key-...
X-Environment: development
```
**Production Integration**:
```
Authorization: Bearer prod-key-...
X-Environment: production
```
### A/B Testing with Headers
Identify which variant is being tested:
**Integration A**:
```
Authorization: Bearer key...
X-AB-Test-Variant: A
X-Model: gpt-4
```
**Integration B**:
```
Authorization: Bearer key...
X-AB-Test-Variant: B
X-Model: claude-3-5-sonnet
```
Your backend logs can track performance by variant.
### User Tier Routing
Route premium users to better models:
```
Authorization: Bearer key...
X-User-Tier: ${user.tier}
X-Max-Quality: high
```
Your backend reads `X-User-Tier` and selects appropriate model.
### Custom Timeout Headers
Some APIs support custom timeout headers:
```
Authorization: Bearer key...
X-Timeout-Seconds: 45
X-Max-Retries: 3
```
## Testing Headers
### View Request Headers
Use request inspection tools to verify headers are sent:
1. **Webhook.site**: Create a temporary endpoint
2. **RequestBin**: Capture and inspect requests
3. **Your Backend Logs**: Log incoming headers
Example with webhook.site:
Go to [webhook.site](https://webhook.site) and copy your unique URL.
Create a test integration with your webhook.site URL and add headers.
Trigger a message to the bot.
Check webhook.site to see all headers sent.
### Verify Authentication
Test that authentication works:
```bash theme={null}
# Test your endpoint with headers
curl -X POST https://your-api.com/webhook \
-H "Authorization: Bearer YOUR_KEY" \
-H "X-Custom: value" \
-d '{"messages": [{"role": "user", "content": "test"}]}'
```
Expected: 200 OK response
If 401/403: Check header format and key validity
## Troubleshooting
### Headers Not Working
If your backend doesn't receive headers:
**Check**:
* Header names are spelled correctly (case-sensitive)
* No extra whitespace in names or values
* Headers are saved in integration settings
* Your backend logs incoming headers
### Authentication Fails
If you get 401 errors:
**Common Issues**:
* API key is incorrect or expired
* Header name is wrong (e.g., `X-API-Key` vs. `Authorization`)
* Token format is wrong (missing `Bearer` prefix)
* Key doesn't have required permissions
**Solutions**:
* Verify key in your AI service dashboard
* Check API documentation for correct header format
* Test with curl before configuring in platform
* Generate a new API key if needed
### Headers Are Cut Off
If header values are truncated:
* Check for length limits (usually 8KB total)
* Very long tokens may need to be split
* Use shorter identifiers where possible
## Header Limits
Be aware of these limits:
| Limit | Value |
| ----------------------- | ------------------ |
| Max Headers | 50 per integration |
| Max Header Name Length | 256 characters |
| Max Header Value Length | 8KB |
| Total Headers Size | 16KB |
These limits are generous and should accommodate all standard use cases.
## Examples by Platform
### OpenAI Chat Completions
```
Authorization: Bearer sk-proj-...
Content-Type: application/json
OpenAI-Organization: org-...
```
### Anthropic Messages API
```
x-api-key: sk-ant-...
anthropic-version: 2023-06-01
Content-Type: application/json
```
### Google Vertex AI
```
Authorization: Bearer ya29...
X-Goog-User-Project: project-id
Content-Type: application/json
```
### Azure OpenAI
```
api-key: your-azure-key
Content-Type: application/json
```
### Hugging Face
```
Authorization: Bearer hf_...
X-Wait-For-Model: true
Content-Type: application/json
```
## Next Steps
Complete integration configuration
Test headers with multiple integrations
Enter header name and value pairs:
```
Name: Authorization
Value: Bearer sk-proj-abc123...
```
Click **Add Header** to include additional headers.
Click **Save** to apply the configuration.
## Common Header Patterns
### Authentication Headers
**Bearer Token**:
```
Authorization: Bearer sk-proj-abc123xyz...
```
**API Key**:
```
X-API-Key: your-api-key-here
```
**Basic Auth**:
```
Authorization: Basic base64(username:password)
```
### API-Specific Headers
**OpenAI**:
```
Authorization: Bearer sk-proj-...
Content-Type: application/json
```
**Anthropic**:
```
x-api-key: sk-ant-...
anthropic-version: 2023-06-01
Content-Type: application/json
```
**Custom Service**:
```
Authorization: Bearer YOUR_TOKEN
X-Service-Version: v2
X-Client-ID: chatbot-platform
```
### Tracking and Analytics
**Request Identification**:
```
X-Request-ID: unique-request-id
X-Bot-ID: bot_123
X-Team-ID: team_456
```
**User Context**:
```
X-User-Platform: telegram
X-User-Tier: premium
X-Conversation-ID: conv_789
```
### Feature Flags
**Enable Features**:
```
X-Enable-Streaming: true
X-Enable-Tools: true
X-Max-Tokens: 1000
```
## Dynamic Headers
Some headers are automatically added by the platform:
### Platform-Added Headers
```
X-Chatbot-Platform-Version: 1.72.4
X-Bot-ID: bot_abc123
X-Integration-ID: int_xyz789
User-Agent: ChatbotPlatform/1.0
```
These are included in every request and cannot be overridden.
### Request-Specific Headers
The platform may add context-specific headers:
```
X-Conversation-ID: conv_abc123
X-User-Platform: telegram
X-Message-Count: 5
```
## Security Best Practices
**Never expose API keys in client-side code**. Headers are configured server-side and never exposed to end users.
### Protecting API Keys
**Do**:
* Use environment variables for sensitive values
* Rotate keys regularly
* Use separate keys for development and production
* Restrict key permissions to minimum required
**Don't**:
* Hardcode keys in application code
* Share keys in documentation or screenshots
* Use the same key across multiple services
* Grant excessive permissions to API keys
### Header Validation
Your backend should validate:
* **Authentication**: Verify token is valid and not expired
* **Authorization**: Check token has required permissions
* **Origin**: Optionally verify requests come from Chatbot Platform
* **Rate Limiting**: Implement per-key rate limits
## Advanced Use Cases
### Multi-Environment Setup
Use different headers for different environments:
**Development Integration**:
```
Authorization: Bearer dev-key-...
X-Environment: development
```
**Production Integration**:
```
Authorization: Bearer prod-key-...
X-Environment: production
```
### A/B Testing with Headers
Identify which variant is being tested:
**Integration A**:
```
Authorization: Bearer key...
X-AB-Test-Variant: A
X-Model: gpt-4
```
**Integration B**:
```
Authorization: Bearer key...
X-AB-Test-Variant: B
X-Model: claude-3-5-sonnet
```
Your backend logs can track performance by variant.
### User Tier Routing
Route premium users to better models:
```
Authorization: Bearer key...
X-User-Tier: ${user.tier}
X-Max-Quality: high
```
Your backend reads `X-User-Tier` and selects appropriate model.
### Custom Timeout Headers
Some APIs support custom timeout headers:
```
Authorization: Bearer key...
X-Timeout-Seconds: 45
X-Max-Retries: 3
```
## Testing Headers
### View Request Headers
Use request inspection tools to verify headers are sent:
1. **Webhook.site**: Create a temporary endpoint
2. **RequestBin**: Capture and inspect requests
3. **Your Backend Logs**: Log incoming headers
Example with webhook.site:
Go to [webhook.site](https://webhook.site) and copy your unique URL.
Create a test integration with your webhook.site URL and add headers.
Trigger a message to the bot.
Check webhook.site to see all headers sent.
### Verify Authentication
Test that authentication works:
```bash theme={null}
# Test your endpoint with headers
curl -X POST https://your-api.com/webhook \
-H "Authorization: Bearer YOUR_KEY" \
-H "X-Custom: value" \
-d '{"messages": [{"role": "user", "content": "test"}]}'
```
Expected: 200 OK response
If 401/403: Check header format and key validity
## Troubleshooting
### Headers Not Working
If your backend doesn't receive headers:
**Check**:
* Header names are spelled correctly (case-sensitive)
* No extra whitespace in names or values
* Headers are saved in integration settings
* Your backend logs incoming headers
### Authentication Fails
If you get 401 errors:
**Common Issues**:
* API key is incorrect or expired
* Header name is wrong (e.g., `X-API-Key` vs. `Authorization`)
* Token format is wrong (missing `Bearer` prefix)
* Key doesn't have required permissions
**Solutions**:
* Verify key in your AI service dashboard
* Check API documentation for correct header format
* Test with curl before configuring in platform
* Generate a new API key if needed
### Headers Are Cut Off
If header values are truncated:
* Check for length limits (usually 8KB total)
* Very long tokens may need to be split
* Use shorter identifiers where possible
## Header Limits
Be aware of these limits:
| Limit | Value |
| ----------------------- | ------------------ |
| Max Headers | 50 per integration |
| Max Header Name Length | 256 characters |
| Max Header Value Length | 8KB |
| Total Headers Size | 16KB |
These limits are generous and should accommodate all standard use cases.
## Examples by Platform
### OpenAI Chat Completions
```
Authorization: Bearer sk-proj-...
Content-Type: application/json
OpenAI-Organization: org-...
```
### Anthropic Messages API
```
x-api-key: sk-ant-...
anthropic-version: 2023-06-01
Content-Type: application/json
```
### Google Vertex AI
```
Authorization: Bearer ya29...
X-Goog-User-Project: project-id
Content-Type: application/json
```
### Azure OpenAI
```
api-key: your-azure-key
Content-Type: application/json
```
### Hugging Face
```
Authorization: Bearer hf_...
X-Wait-For-Model: true
Content-Type: application/json
```
## Next Steps
Complete integration configuration
Test headers with multiple integrations